Step-by-Step Setup: How to Begin Automating Your Home

Home automation beginners guide
Welcome to the home automation beginners guide! If you're interested in making your home smarter and more efficient, you've come to the right place. In this guide, we will walk you through the step-by-step process of setting up your home automation system. Whether you're a tech-savvy enthusiast or a complete beginner, this guide will help you automate your home and simplify your life.
Home automation setup
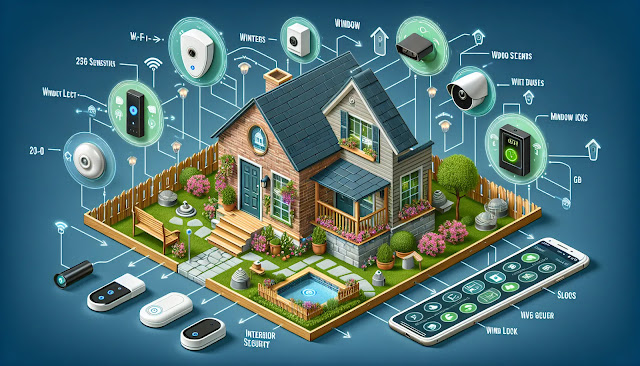
Before we dive into the step-by-step guide, let's first understand what home automation is and why it's worth considering. Home automation refers to the use of technology to control and automate various devices and systems in your home. It allows you to connect and control everything from lights, thermostats, security cameras, and even kitchen appliances, all from a single central hub or smartphone app.
Setting up a home automation system may seem daunting at first, but don't worry! We will guide you through each step and make the process as simple as possible. So, let's get started!
Step-by-step guide
Step 1: Determine your needs
The first step in setting up your home automation system is to determine your needs and priorities. Consider which areas of your home you would like to automate and what features are important to you. Are you primarily interested in energy efficiency and cost savings? Or do you want to enhance your home security with smart locks and cameras? By clearly defining your goals, you can make better decisions when selecting the devices and technologies for your home automation setup.
Step 2: Research and choose a home automation platform
Once you have a good understanding of your needs, it's time to research and choose a home automation platform. There are several platforms available in the market, each offering its own set of features and compatibility options. Some popular platforms include Apple HomeKit, Amazon Alexa, Google Assistant, and Samsung SmartThings. Take your time to research and compare the platforms based on your specific requirements before making a decision.
Step 3: Select compatible devices
After choosing a home automation platform, you need to select compatible devices that will work seamlessly with the chosen platform. These devices can include smart light bulbs, thermostats, door locks, security cameras, and more. It's essential to ensure that the devices you choose are compatible with your selected platform to avoid any compatibility issues.
Step 4: Set up the central hub
Most home automation platforms require a central hub or gateway to connect and control the devices. The central hub acts as the brain of your home automation system, allowing you to communicate with and control all the connected devices. Follow the manufacturer's instructions to set up the central hub and connect it to your home network.
Step 5: Install and configure devices
Once you have the central hub set up, it's time to install and configure the devices in your home. Start with one device at a time and follow the manufacturer's instructions for installation. Typically, this involves connecting the device to the central hub and configuring its settings through the associated smartphone app or web interface. Be patient and take your time to ensure everything is properly set up.
Step 6: Create automation routines and scenes
One of the most exciting aspects of home automation is the ability to create automation routines and scenes. Automation routines allow you to automate certain tasks based on specific triggers or conditions. For example, you can set up a routine that automatically turns off all the lights and lowers the thermostat when you leave home. Scenes, on the other hand, enable you to control multiple devices simultaneously with a single command. You can create a "Movie Night" scene that dims the lights, closes the curtains, and turns on the TV and sound system, all with a simple voice command or button press.
Step 7: Test and troubleshoot
Once your home automation system is set up, it's important to test and troubleshoot to ensure everything is working correctly. Test each device and automation routine to make sure they are functioning as expected. If you encounter any issues, refer to the manufacturer's troubleshooting guide or seek assistance from online forums and communities dedicated to home automation.
Step 8: Expand and customize
Congratulations! You have successfully set up your home automation system. But the journey doesn't end here. Home automation is a dynamic and evolving field, with new devices and technologies being introduced regularly. Feel free to expand and customize your system as your needs change or new features become available. Add more devices, experiment with advanced automation techniques, and explore integrations with other smart home technologies to enhance your home automation experience.
Remember, home automation is all about making your life easier and more convenient. Enjoy the benefits of a smarter home and take advantage of the endless possibilities that home automation brings.